6) }
. if we don’t want sqlite3 database then we have to configure our own database
with the following parameters
1) ENGINE: Name of Database engine
3) USER: Database Login user name
4) PASSWORD: Database Login password
5) HOST: The Machine on which database server is running
6) PORT: The port number on which database server is running
Note: Most of the times HOST and PORT are optional.
How to Check Django Database Connection:
1) We can check whether django database configurations are properly
configured or not
by using the following commands from the shell
2) D:djangoprojectsmodelProject>py manage.py shell
>>> from django.db import connection
>>> c = connection.cursor()
3) If we are not getting any error means our database configurations
are proper.
Configuration of MySQL Database:
1) First we have to create our own logical database in the mysql.
mysql> create database employeedb;
2) We have to install mysqlclient by using pip as follows
pip install –only-binary :all: mysqlclient
|
|
|
|
3) ‘ENGINE’: ‘django.db.backends.mysql’,
|
|
|
|
|
|
|
|
|
8) }
D:djangoprojectsmodelProject>py manage.py shell
>>> from django.db import connection
>>> c = connection.cursor()
Configuration of Oracle Database:
|
|
|
|
3) ‘ENGINE’: ‘django.db.backends.oracle’,
|
|
|
|
|
|
|
|
|
|
|
Note: We can find oracle database name by using the
following command.
SQL> select * from global_name;
. A Model is a Python class which contains database information.
. A Model is a single, definitive source of information about our data.
It contains fields. and behavior of the data what we are storing.
. Each model maps to one database table.
. Every model is a Python class which is the child class of (django.db.models.Model)
. Each attribute of the model represents a database field.
. We have to write all model classes inside ‘models.py’ file.
1. Create a project and application and link them.
After creating a project and application, in the models.py file,
write the following code:
django-admin startproject modelProject
python manage.py startapp testApp
models.py
1) from django. db impor tmodels
|
|
|
3) #Createyourmodelshere.
|
4) class Employee(models.Model):
|
5) eno=models.IntegerField()
|
6) ename=models.CharField(max_length=30)
|
7) esal=models.FloatField()
|
8) eaddr=models.CharField(max_length=30)
|
Note: This model class will be converted into Database table.
Django is responsible for this.
table_name: appName_Employee
fields: eno, ename, esal and eaddr. And one extra field: id
behaviors: eno is of type Integer, ename is of type Char and
max_length is 30 characters.
|
|
Model Class = Database Table Name + Field Names + Field Behaviors
|
Converting Model Class into Database specific SQL Code:
Once we write Model class, we have to generate the corresponding SQL Code.
For this, we have to use “makemigrations” command.
Python manage.py make migrations
It results the following:
Migrations for ‘testApp’:
testApp/migrations/0001_initial.py
– Create model Employee
How to see corresponding SQL Code of Migrations:
To see the generated SQL Code, we have to use the following command “sqlmigrate”
python manage.py sqlmigrate testApp 0001
|
|
|
|
3) –Create model Employee
|
|
|
5) CREATETABLE“testApp_employee”(“id”integerNOTNULLPRIMARYKEYAUTOIN
|
CREMENT, “eno” integer NOT NULL, “ename” varchar(30) NOT NULL, “esal” real N
|
OT NULL, “eaddr” varchar(30) NOT NULL);
|
|
|
Note: Here 0001 is the file passed as an argument
1) For every table(model), Django will generate a special column named with “id”.
2) ID is a Primary Key. (Unique Identifier for every row inside table is considered as a
3) This field(id) is auto increment field and hence while inserting data, we are not
required to provide data for this field.
4) This id field is of type “AutoField”
5) We can override the behavior of “id” field and we can make our own field as “id”.
6) Every Field is by default “NOT NULL”.
How to execute generated SQL Code (migrate Command):
After generating sql code, we have to execute that sql code to create table in database.
For this, we have to use ‘migrate’ command.
Apply all migrations: admin, auth, contenttypes, sessions, testApp
. Applying contenttypes.0001_initial… OK
. Applying auth.0001_initial… OK
. Applying admin.0001_initial… OK
. Applying admin.0002_logentry_remove_auto_add… OK
. Applying contenttypes.0002_remove_content_type_name… OK
. Applying auth.0002_alter_permission_name_max_length… OK
. Applying auth.0003_alter_user_email_max_length… OK
. Applying auth.0004_alter_user_username_opts… OK
. Applying auth.0005_alter_user_last_login_null… OK
. Applying auth.0006_require_contenttypes_0002… OK
. Applying auth.0007_alter_validators_add_error_messages… OK
. Applying auth.0008_alter_user_username_max_length… OK
. Applying sessions.0001_initial… OK
What is the Advantage of creating Tables with ‘migrate’ Command
If we use ‘migrate’ command, then all Django required tables will be created in addition to
our application specific tables. If we create table manually with sql code, then only our
application specific table will be created and django my not work properly. Hence it is
highly recommended to create tables with ‘migrate’ command.
How to Check created Table in Django admin Interface:
We have to register model class in ‘admin.py’ file.
1) from django .contrib import admin
|
2) from testApp .models import Employee
|
|
|
4) #Registery our models here.
|
|
|
6) admin.site.register(Employee)
|
Creation of Super User to login to admin Interface:
We can create super user with the following command by providing username, mailid,
python manage.py createsuperuser
. We can login to admin interface → Start the server and login to admin interface using the created credentials.
. python manage.py runserver
. Open the following in browser: http://127.0.0.1:8000/admin/
Difference between makemigrations and migrate:
“makemigrations” is responsible to generate SQL code for Python model class whereas
“migrate” is responsible to execute that SQL code so that tables will be created in the
To Display Data in admin Interface in Browser:
models.py
1) from django .db import models
|
|
|
3) #Create your models here.
|
|
|
5) class Employee(models.Model):
|
6) eno=models.IntegerField()
|
7) ename=models.CharField(max_length=30)
|
8) esal=models.FloatField()
|
9) eaddr=models.CharField(max_length=30)
|
|
|
11) return ‘Employee Object with eno: +str(self.no)’
|
1) from django .contrib import admin
|
2) from testApp .models import Employee
|
|
|
4) #Register your models here.
|
|
|
6) class EmployeeAdmin(admin.ModelAdmin):
|
7) list_display=[‘eno’,‘ename’,‘esal’,‘eaddr’]
|
|
|
9) admin.site.register(Employee,EmployeeAdmin)
|
We should do this registration in a single line otherwise we are getting error.
admin.site.register(Employee)
admin.site.register(EmployeeAdmin)
Practice Activity:
Create the following tables and populate with some sample data
1)Job(posting date,location,offeredsalary,qualification)
2) Book(number,title,author,publisheddate)
3) Customer(name,ano,mailid,phonenumber,age)
Now we can write views to get data from the database and send to template.
Before writing views.py file, create “templates” and “static” folder with respective
application folders and HTML and CSS files and link them in settings.py file.
1) from django .shortcuts import render
|
2) from testApp .models import Employee
|
|
|
4) #Create your views here.
|
|
|
6) emp_list=Employee.objects.all()
|
7) my_dict={’emp_list’:emp_list}
|
8) return render(request, ‘testApp/emp.html’, context=my_dict)
|
|
|
2) {%load static files %}
|
3) <htmllang=“en”dir=“ltr”>
|
|
|
5) <meta charset=“utf-8”>
|
|
|
7) <link rel=“stylesheet” href=“{% static ‘/css/demo.css’%}”>
|
|
|
|
|
|
|
11) <h1> The employees list is : </h1>
|
|
|
|
|
|
|
|
|
|
|
|
|
|
|
|
|
|
|
|
|
22) {% for emp in emp_list %}
|
|
|
24) <td> {{emp.eno}}</td>
|
25) <td>{{emp.ename}}</td>
|
26) <td>{{emp.esal}}</td>
|
27) <td> {{emp.eaddr}}</td>
|
|
|
|
|
|
|
|
|
32) {%else%}
33) <p> No records found </p>
|
|
|
|
|
|
|
|
|
|
Important FAQs Related to Model and database
1) How to configure database inside settings.py?
2) How to check connections?
3) How to define Model class inside models.py
4) How we can perform makemigrations?
5) How we can perform migrate?
6) How to add our model to admin interface inside admin.py
7) To display total data how to write ModelAdmin class inside admin.py
8) How to createsuperuser?
9) How to login to admin interface and add data to our tables?
10) How to see generated sqlcode b’z of makemigrations
We can use Faker Module to generate fake data for our database models.
1) from faker import Faker
|
|
|
|
|
|
|
5) print(name)
6) first_name= fakegen.first_name()
|
7) last_name= fakegen.last_name()
|
|
|
|
|
|
|
|
|
12) number=fakegen.random_number(5)
|
|
|
14) email=fakegen.email()
|
|
|
16) print(fakegen.city())
|
17) print(fakegen.random_int(min=0, max=9999))
|
18) print(fakegen.random_element(elements=(‘Project Manager’, ‘TeamLead’, ‘Softwa
|
re Engineer’)))
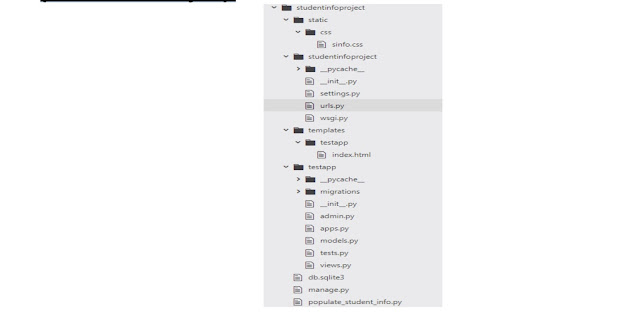
Working with MYSQL Database (studentinfo project):
settings.py
1) TEMPLATE_DIR=os.path.join(BASE_DIR,‘templates’)
|
|
|
|
|
|
|
|
|
|
|
|
|
8) ‘BACKEND’: ‘django.template.backends.django.DjangoTemplates’,
|
9) ‘DIRS’: [TEMPLATE_DIR],
|
|
|
|
|
|
|
|
|
|
|
15) ‘ENGINE’: ‘django.db.backends.mysql’,
|
|
|
|
|
|
|
|
|
20) }
1) from django .db import models
|
|
|
3) #Create your models here.
|
4) class Student(models.Model):
|
5) name=models.CharField(max_length=30)
|
6) marks=models.IntegerField()
admin.py
|
1) from django .contrib import admin
|
|
|
3) #Register your models here.
|
4) from testapp .models import Student
|
5) class StudentAdmin(admin.ModelAdmin):
|
6) list_display=[‘name’,‘marks’]
|
|
|
8) admin.site.register(Student,StudentAdmin)
|
1) from django .shortcuts import render
|
2) from testapp .models import Student
|
|
|
4) #Create your views here.
|
5) def studentview(request):
|
6) student_list=Student.objects.order_by(‘marks’)
|
7) my_dict={‘student_list’:student_list}
|
8) return render(request,‘testapp/students.html’,context=my_dict)
|
|
|
2) <htmllang=“en”dir=“ltr”>
|
|
|
4) <meta charset=“utf-8”>
|
|
|
|
|
|
|
|
|
9) <table border=“1” margin=‘auto’>
|
|
|
|
|
12) <th>Marks</th>
|
|
14) {% for student in student_list %}
|
|
|
16) <td>{{student.name}}</td>
|
17) <td>{{student.marks}}</td>
|
|
|
|
|
|
|
|
|
22) <p>No Studetns found</p>
|
|
|
|
|
25) </html>
1) from django .conf .urls import url
|
2) from django .contrib import admin
|
3) from testapp import views
|
|
|
|
|
6) url(r‘^admin/’, admin.site.urls),
|
7) url(r‘^$’, views.studentview),
|
8) ]
Working with MYSQL Database and Faker Module
(studentinfo Project)
1) TEMPLATE_DIR=os.path.join(BASE_DIR,‘templates’)
|
2) STATIC_DIR=os.path.join(BASE_DIR,‘static’)
|
|
|
|
|
|
|
|
|
|
|
|
|
9) ‘BACKEND’: ‘django.template.backends.django.DjangoTemplates’,
|
10) ‘DIRS’: [TEMPLATE_DIR],
|
|
|
|
|
|
|
|
|
|
|
16) ‘ENGINE’: ‘django.db.backends.mysql’,
|
|
|
|
|
|
|
|
|
|
|
22) STATIC_URL = ‘/static/’
|
|
|
|
|
|
|
1) from django .db import models
|
|
|
3) #Create your models here.
|
4) class Student(models.Model):
|
5) rollno=models.IntegerField()
|
6). name=models.CharField(max_length=30)
|
7) dob=models.DateField()
|
8) marks=models.IntegerField()
|
9) email=models.EmailField()
|
10) phonenumber=models.IntegerField(15)
|
11) address=models.TextField()
1) from django .contrib import admin
|
2) from testapp .models import Student
|
|
|
4) #Register your models here.
|
5) class StudentAdmin(admin.ModelAdmin):
|
6) list_display=[‘rollno’,‘name’,‘dob’,‘marks’,’email’,‘phonenumber’,‘address’]
|
|
|
8) admin.site.register(Student,StudentAdmin)
|
|
|
2) os.environ.setdefault(‘DJANGO_SETTINGS_MODULE’,‘studentinfoproject.settings’)
|
|
|
|
|
|
|
|
|
6) from testapp .models import Student
|
7) from faker import Faker
|
|
|
|
|
10) def phonenumbergen():
|
|
|
|
|
|
|
14) num=num+str(randint(0,9))
|
|
|
|
|
|
|
18) frollno=fake.random_int(min=1,max=999)
|
|
|
|
|
21) fmarks=fake.random_int(min=1,max=100)
|
|
|
23) fphonenumber=phonenumbergen()
|
24) faddress=fake.address()
|
25) student_record=Student.objects.get_or_create(rollno=frollno,name=fname,do
b=fdob,marks=fmarks,email=femail,phonenumber=fphonenumber,address=faddre
|
|
|
26) populate(30)
1) from django .shortcuts import render
|
2) from testapp .models import Student
|
|
|
4) #Create your views here.
|
5) def home_page_view(request):
|
6) students=Student.objects.all()
|
7) #students=Student.objects.filter(marks__lt=35)
|
8) #students=Student.objects.filter(name__startswith=’A’)
|
9) #students=Student.objects.all().order_by(‘marks’)
|
10) #students=Student.objects.all().order_by(‘-marks’)
|
11) return render(request,‘testapp/index.html’,{‘students’:students})
|
|
|
|
|
3) <htmllang=“en”dir=“ltr”>
|
|
|
5) <meta charset=“utf-8”>
|
|
|
7) <link rel=“stylesheet” href=“https://maxcdn.bootstrapcdn.com/bootstrap/3.3.7
|
/css/bootstrap.min.css” integrity=“sha384-
BVYiiSIFeK1dGmJRAkycuHAHRg32OmUcww7on3RYdg4Va+PmSTsz/K68vbdEjh4u” c
|
|
|
8) <link rel=“stylesheet” href=”{%static “css/sinfo.css”%}”>
|
|
|
|
|
11) <div class=“container” >
|
12) <h1>Student Information</h1><hr>
|
|
|
14) {%for student in students%}
|
15) <h2>{{student.name}} Information</h2><hr>
|
|
|
17) <li>Student Rollno:{{student.rollno}}</li>
|
18) <li>Student DOB:{{student.dob}}</li>
|
19) <li>Student Marks:{{student.marks}}</li>
|
20) <li>Student Email:{{student.email}}</li>
|
21) <li>Student Phone Number:{{student.phonenumber}}</li>
|
22) <li>Student Address:{{student.address}}</li>
|
|
|
|
|
|
|
26) {%else%}
27) <p>Student Records Are Not Available</p>
|
|
|
|
|
|
|
|
|
1) from django .conf .urls import url
|
2) from django .contrib import admin
|
3) from testapp import views
|
|
|
|
|
6) url(r‘^admin/’, admin.site.urls),
|
7) url(r‘^$’, views.home_page_view),
|
|
|
|
|
|
|
|
|
|
|
|
|
|